In this digital world, losing important and beloved photos is a common occurrence due to various reasons and that is quite scary. The Macintosh computer, aka Mac, is a thriving product by Apple with over currently 100 million active users. It has brought ease to such an extent that people are using it for professional and personal purposes. However, it’s a machine and permanent data loss is definitely a potential threat. If you are looking to learn the reasons and methods to recover deleted photos from Mac computers, keep reading this comprehensive article.
Part 1: Reasons for photo loss on Mac
1. Deleting Photos Accidentally:
Humans are prone to making errors; therefore, accidental deletion remains one of the leading causes of data loss in Mac. Most of the time, this unintentional data deletion occurs when Mac users are either managing their photos or while deleting duplicate photos. If you don’t back up your pictures and use the “Shift + Del” command to remove unwanted images, they are permanently deleted. The photos don’t move to the Trash. Another leading cause of photos loss on Mac is accidentally emptying Trash without preparing a backup.
2. Virus Attacks:
Antivirus technology is becoming more innovative every day, but viruses and malware are no different. Since the beginning of computer days, data loss due to virus and malware infections are very common. Almost 7% of the data loss episodes occur due to virus attacks rendering photos unreadable, and in some cases, the data is completely deleted. You can certainly avoid getting stuck in such scenarios by taking all precautionary measures. Always invest in a proper antivirus, do not open spam or unauthorized emails, and never connect infected external devices to your Mac and more.
3. Hard Drive Failures:
All your precious photos are actually stored on the hard drive. Therefore a hard drive error can result in total data loss, including your digital images. With time, hard drives accumulate bad sectors resulting in an unexpected crash. Hard drive problems like crashes also occur due to manufacturing faults, sudden power outages or surges, overheating, logical errors, mechanical failures and more. If your hard drive is not working due to logical errors, data recovery is undoubtedly very much possible. We will introduce some efficient methods later in this article. Wrong partition and partition errors are another main reason for data loss in Mac.
4. Physical Damage to Mac computer:
Mac computers are well known for their robust build and resistance to minor damages. The products contain premium quality parts that ensure longevity. However, like any other digital device, Mac computers are also embedded with delicate parts. When these parts experience any physical damages like accidental dropping, water exposure or more, they are likely to malfunction. One of the principal reason why photos vanish is the physical damage which eventually leads to device failure.
5. Photo Editing Software:
There are several photo editing software available in the market for Mac users. The use of photo editing software is quite prevalent nowadays. People use them to remove imperfections in their digital images and to enhance their quality. Though, it is a common practice of many that users edit the original photos. Third-party photo editing software can crash, and if you experience it while editing the original photo, the picture likely gets corrupted. One good practice to avoid this is to create a copy of your images and then edit them. This way, you never lose access to the original, even if the software crashes.
Part 2: Recover Deleted Photos from Mac
Now you have ample information about the reason behind photo loss on Mac; it’s time to list some effective methods to recover photos. Keep reading to know more.
1. Use The Photo App Recovery:
Mac computers come with a Photos App that helps users to organize and manage visual data better. People use this app very commonly to view and delete their digital pictures. One great thing about this app is when you delete an album using this application; it is shifted to a tab “Recently Deleted Album” If you have accidentally or deliberately deleted the album, it stays in there for 30 days. When you notice that your photos are missing, immediately go to this app to recover them. Just follow the below-mentioned simple steps for recovery from this app.
- Go to Photos App.
- Next, you have to click on the “Recently Deleted” option from the left panel.
- You will see a thumbnail of photos and videos deleted and also the days remaining to recover them
- Click on the ones you want to retrieve and click the “Recover” button on the top right corner.
2. Recover From Trash:
When you delete pictures or any other file on Mac computers, it is moved to Trash. Unless you have used the Shift+ Del command, the lost images will be present in Trash. You can restore them in a fundamental few steps.
- Click on the trash icon to access the Trash section to view your deleted photos
- If you remember the file name, enter it in the search box to locate the file. If you don’t scroll the Trash to find the ones you need.
- Select all the deleted photos that you want to recover. Right-click and select the Put-Back option to recover them to their original location. To store them in another folder, use the drag and drop option.
- You can also restore files via the terminal command. It is only possible if you exactly remember the file name. Use the command cd. Trash to access the trash folder. Then enter mv “filename” to move the photo to the location where it was initially present.
3. Mac Time Machine Recovery:
Mac computers have an incredible application known as Time Machine. It allows users to generate a backup, and if you enabled this backup creation, you could use this method to retrieve your lost photos. However, even if you don’t recall enabling this option, chances are you might have done it at some point, and it’s better to check it to recover your photos. Follow the below-mentioned steps.
- Open folder where photos were deleted from.
- From the menu bar, click the Time Machine option.
- Enter the Time Machine, and you will see several windows. Locate the one where you find the lost images.
- Click on the restore button to end the recovery process.
Part 3: Recover deleted photo files with Wondershare Recoverit
Recovering photos from Mac computers can be tricky if the solutions mentioned above are not applicable. When nothing seems to work in such challenging situations, a photo recovery software like Wondershare Recoverit comes to the rescue. The software is available for macOS platforms and is very intuitive. The tool is created to recover image files in a variety of formats regardless of the reason why you lost them. Do you want to know how to retrieve them with utmost convenience via Wondershare Recovery? Follow the below-mentioned step.
Step 1 – Select Location:

After downloading, install the software. Now launch it, select the hard drive from where the photos were deleted, and click on the start button.
Step 2 – Scan The Hard Drive:

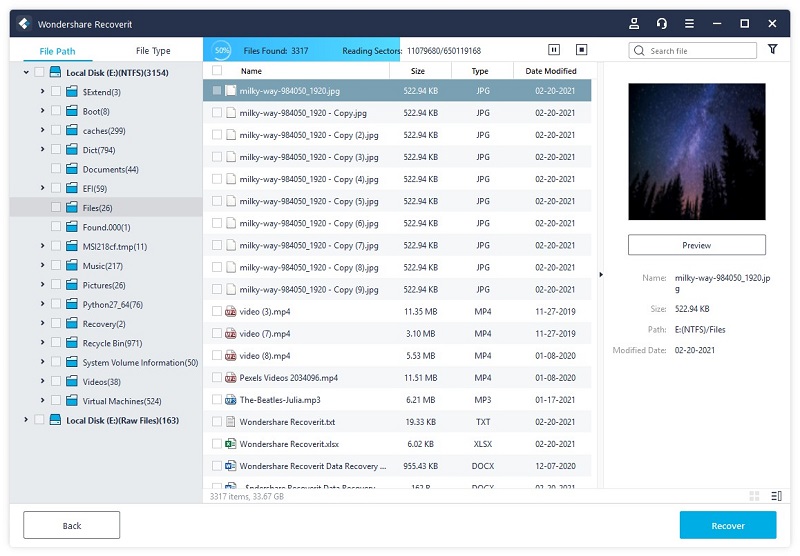
The Wondershare Recovery data recovery tool will carry out a thorough scan to find every lost file from the hard drive. Do not end the process in between, and be patient. The process can take a few minutes.
Step 3 – Preview and Recover Photos from Mac:

Once the scan is ended, you will see the recovered photos and the software permits to preview them before restoring. Choose the ones you want to get back and hit the Recover icon to get them back on your PC.
Conclusion
Wondershare Recoverit is one of the best photo recovery software which is a must-have tool for every computer user who is feeling troubled due to a recent data or photo loss event. The software can recover any data like pictures, music, videos, documents, and many others regardless of the reason behind the data loss. The Wondershare Recoverit has an excellent success rate in file recovery and supports recovering photos of a wide variety of formats. To check out the software, download the free version now from the official website.